Sunday, September 13, 2020

Quaran-bagels

I should start off by saying that I don't have a sourdough starter, the on trend accessory of any quaran-baker's kitchen. More accurately, I don't have an *active* sourdough starter, because I do have one buried in the back of the freezer that may or may not wake up when I thaw it. Thankfully, we have had plenty of flour (25 pound bags from Costco FTW), but the prospect of caring for yet another living organism right now seems overwhelming.

Enter rapid-rise yeast from stage left, plus a propitious picture shared by A of family bagel-making from stage right. When combined with a pandemic-induced dearth of bagels in the bakery section of the grocery store, my mission became clear: homemade bagels were in our future. (We do have delicious/expensive bagels relatively nearby, but the line can be ridiculous.) I asked A for the recipe in June, and then I was off.


All I needed was...malted milk powder? I never knew that was the secret ingredient! But it turns out it's necessary both in the dough and in the water bath. I was just relieved that I didn't need to use lye; previously, I had been scared off from bagel-making because I thought this toxic compound was necessary. Time has also allowed me to come around to the idea of two steps in cooking; for example, these French fries, which require parboiling prior to a stint in the oven, are delicious. You can see that the sugary/malted-milky water bath resembles a steaming witches' brew.


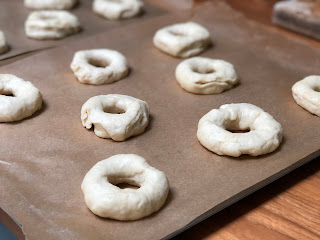
After a quick dip on each side in the water bath and a brush of egg white, the bagels are ready for their twenty minutes in the oven. Today I made plain, cinnamon raisin, everything, and furikake (special thanks to ER and TR for the suggestion).


Some were devoured as a late lunch, some were delivered to our neighbors, some were sliced and frozen.

One side note before you start your very own bagel-making: I'm aware that it's been a long time since I've posted (nigh on 8 years, though in some ways it seems like no time has passed). Here is a brief summary of changes: A was born and is now 6; E is almost "double digits" and a voracious reader; we moved to Seattle; I have a real job; the kids started school recently, one in person and one remote.


During several moves and a home renovation, I have continued to cook and bake, but it's been hard to figure out how a blog fits in. J and S suggested a resurrection a few months ago, so here we are. As I get perilously close to the answer of the meaning of life and as the pandemic drags on, hopefully the blog will provide a welcome distraction for me and my small cadre of readers alike.

I should note that J's special request was not for bagels; stay tuned for future editions, one of which may include jook!

Bagels
Adapted from King Arthur Flour
Makes approximately 16
Total time: 3 hours to overnight (1 hour active)

For the bagels:
2 1/4 t. (1 packet) active dry yeast, rapid-rise, or instant yeast
2 c. lukewarm water
2 T. sugar
1 T. salt
5 3/4 c. all-purpose flour
1/2 c. malted milk powder

For the water bath:
2 quarts water
2 T. malted milk powder
1 T. sugar

Toppings:
2 egg whites, beaten with a fork
if desired: everything mixture (see below), furikake, etc.

In a large bowl, mix together all of the ingredients for the bagels (no need to allow the yeast to bloom with the water for 5 minutes as is called for in many recipes). Knead until smooth, approximately 5 minutes/300 turns if by hand. In general, the dough should be slightly wet and shiny rather than floury. Shape into a ball. If making the night before, wrap in two layers of plastic wrap and place in the fridge overnight; if making the same day, place in a lightly oiled bowl, cover with plastic, and allow to rise until doubled (1-2 hours).

When ready to bake, gently deflate the dough, and transfer to work surface (without extra flour on hand). Prepare the water bath by adding all the ingredients into a wide, but deep, pot; then bring to a boil. Preheat the oven to 425 (I use convect).

Divide the dough into 16 pieces, preferably with a pastry scraper. Shape them individually into balls. Next, poke a hole through the middle with your index finger, and twirl around your thumb to make a bagel shape. Because the dough is elastic, and because it will rise, the hole should be at least 1 to 1.5 inches in diameter (i.e., bigger than you think it needs to be). Place the bagels on a parchment-lined baking sheet as they are made.

Once all the bagels are shaped, lower the water bath to a simmer and gently transfer 4 bagels into the water. Simmer on each side for 30 seconds, then use a strainer to return them to the baking sheet. Brush with egg white mixture, plus toppings as desired.

Bake for 20 minutes, or until they are a deep golden brown. Then enjoy!

Variation: To make cinnamon raisin bagels, spread the dough out after kneading into an 8" by 8" rectangle. Sprinkle 1 t. cinnamon and 1/2 c. raisins onto rectangle. Then roll up like a jelly roll, and knead a few turns to make sure ingredients are incorporated. Proceed with recipe.


Everything topping
Adapted from the now discredited AR

3 T. white sesame seeds
3 T. black sesame seeds
1 T. poppy seeds
2 T. dehydrated onion
1 T. flaky sea salt

Mix all ingredients, and store in a tightly sealed jar.

Thursday, November 15, 2012

'Tis the season of peppermint! (3)

I feel out of practice at this.

It's been a long time, as you know, since I've sat down at the computer with the sole goal of updating you on a recipe that I want to share. But on this rapidly-becoming-cloudy afternoon, with my sleeping sick daughter upstairs, I decided that I would attack a post. Only to discover that even the format of Blogger has changed since my last post! (I dislike change.)

It's weird though, because in a way I haven't stopped blogging. I use my recipe index regularly and I refer people to it sometimes. Though I (obviously) haven't been writing them down when I think of them, turns of phrase that I like, and that I want to share, appear in my head with some frequency (R wrote about this feeling before she closed up shop some months ago). And often when I'm cooking, whether it's something new or something old, I think about whether it would be a good recipe to share on this space.

Last week, in preparation for a lovely weekend away with friends in northern Sonoma County, I made, by special request, these peppermint marshmallows. We enjoyed them with hot cocoa one night, after a day that involved visiting an amazing bakery (also immortalized here) for provisions for a picnic at the picturesque winery where S's brother works. The girls had a great time together all weekend.

As a side note, E is obsessed with her rainboots. Who wouldn't be? H tried them on herself several times during the weekend. (It remains to be seen whether her parents will capitulate.)

On a weekend where we spent a lot of time eating and drinking (and planning our eating and drinking), it seems wrong to focus in on only one recipe. Be that as it may, I present to you one of my new standard winter recipes. You can probably guess that it includes peppermint (and chocolate). I first read about it on a blog that inspires me a while ago, but I very much disagree with her assertion that this candy is good for sending cross-country as a gift. To me, this peppermint bark should be stored in the refrigerator, and really only eaten directly from there. If not, the crisply cut triangles pretty quickly become a melty mess. Also, I think there's something refreshing about icy peppermint candy served icy cold. (Short trips in the car from one refrigerator to another are also acceptable.)

We had easy access to the bark in the fridge all weekend, and we all agreed that it was delicious—whether at 10am, after dinner, with coffee, as an appetizer before dinner. There wasn't much left to take home.

Do you see that pretty, glistening peppermint topping? My first, and best, improvement to this recipe is to outsource the peppermint to King Arthur. Their peppermint crunch (which seems to have changed packaging this season) is so easy to use and lasts so well. My days of loudly smashing candies with a heavy jar and chasing errant peppermint bits across the kitchen counter are, thankfully, over. Yours can be too.

My second improvement to the recipe is to can the candy thermometer. There is no reason that you need a candy thermometer for melting chocolate, especially if you aren't going to temper the chocolate. [Calms down. Steps off of high horse.]

The weather is getting colder. Candy-making season is getting closer. Even now, a delicious peppermint treat could be waiting for you in your fridge, tempting you, allowing you too to conduct a controlled experiment about which time of day it tastes best. Enjoy!

Peppermint Bark

Makes: around 36 candies
Time: 30 minutes active, 1 hour 20 min total

16 oz. white chocolate
1/2 c. peppermint crunch
7 oz. bittersweet chocolate
6 T. cream
3/4 t. peppermint extract

Turn a large rimmed baking sheet over, and cover the bottom securely with foil. Mark out a 9 x 12 inch rectangle.

Melt the white chocolate in a metal bowl set over a pan of barely simmering water, or in a double boiler. Once melted, evenly spread approximately half of the white chocolate onto the marked-out rectangle with a spatula (silicone or icing spatula work well). Sprinkle 1/4 c. peppermint crunch evenly over the white chocolate. Chill in the fridge for 20 minutes.

Meanwhile, melt the bittersweet chocolate and cream in a separate pot until evenly mixed. Add the peppermint extract and cool for 5 minutes. Then spread evenly over the white chocolate/peppermint mixture. Chill in the fridge for 20 minutes.

Melt the white chocolate again. Spread evenly over the chocolate and sprinkle remaining peppermint crunch evenly. Chill in the fridge for 20 minutes.

Cut the candy into triangles (or other shapes if desired). First, cut off misshapen edges with a long, sharp knife to form clean lines. Then cut into 2 inch wide strips both horizontally and vertically, and cut each rectangle crosswise into two triangles. Candy keeps, in a sealed container in the fridge, for 1-2 weeks.

Saturday, August 20, 2011

What I do now

I never thought it would be a year. I did think it might be a while before I came back here regularly, but really, I didn't think it would be this long. I read somewhere that you're not supposed to apologize to your readers on your blog if you haven't posted in a long time because that will make them think that you have a far more interesting life outside the blog.

But it's been a very long time, so here I am apologizing nonetheless. And admitting (shocking!) that I have an interesting life outside this space.

There have been a lot of changes in the past year. A new home, a new job (oh this endless medical training I've signed up for), and a new addition. Baby H was born last October. She's adorable, but even though she looks like she's ready for the kitchen (thanks to my brother E and S), she's not super-helpful (yet).


She crawls and pulls up and is very active. She has an internal magnet that steers her to anything and everything that she's not supposed to touch (outlets, the hearth, paper, the remote control, and I could certainly go on). I must watch her like a hawk, which makes cooking somewhat challenging. With great frequency, she makes me feel like a bad housekeeper. She finds lint and cat hair and cat toys on the floor; she picks them up with her perfect pincer grasp and deposits them into her mouth. I wish her pincer grasp were as reliable with actual food, but this 25th-percentile-weight baby of mine goes in fits and starts in terms of eating.


She's still enjoying purees, but I know that will end soon. Once we wean her from the bottle in the next few months, I fear for her nutrition. Though they are healthy and nutritious and excellent at lowering cholesterol, Cheerios cannot be one's only sustenance. Oh, darling baby H: "You really wear me out, but I love you anyway." Also, you are too young to worry about your cholesterol.

Purees aside, I cook grown-up food too. I do think about food writing, even composing bits of future blog entries in my head when my mind wanders. (Robin described this excellently here.) Before baby H arrived, I had all sorts of mistaken ideas about the work I was going to get done on maternity leave. Besides planning to finish a research paper that is still far from finished, I wanted to write here. Even though I was cooking regularly, somehow I wasn't able to make that next leap to writing. And then it became downright paralyzing: what sort of recipe should I post when it had been so long? After having a very delicious recipe mentioned by a real food blogger, what could I make to match up to that? Should it be a "wow" recipe like Suzanne Goin's halibut with roasted beets on a bed of arugula (page 366)? Should it be my modification of a truly fantastic standby? Should it be something simple but elegant, the sort of daily evening meal that I strive for around here?

As it turns out, my foray back into blogging falls into none of those categories. Instead, since dinner is already made (new recipe—we'll see) and baby H is asleep (along with B, as these nighttime wakenings are exhausting for all), I took some lovely strawberries from our local farmers' market and dipped them in chocolate.


They're not fancy, nor difficult, nor baby-appropriate, but they are dead-easy and delicious (and somewhat retro). As always, I recommend paying close attention to your ingredients. Use only the best strawberries and the best chocolate for the best results. Remember that there's nothing more disappointing than inferior chocolate marring a delicious strawberry. I find the best strawberries are not the ones picked with long stems and designed for dipping; they are often watery and tasteless, suffering from what a friend calls "big berry syndrome." Also, I think there's something perfectly imperfect about the variety of sizes of berries in a typical pint from the farmers' market.

It's been years since I've dipped strawberries, but I'm not really sure why it's been so long. I'm also not really sure why I thought of dipping them today. But I did. And I wrote about it. The paralysis is over. I hope the radio silence isn't as long in the future. In the meantime, enjoy.


Chocolate-dipped Strawberries

Serves: 4
Time: 15 min active, 2 hours 15 min total for chilling

1 pint strawberries
4-5 oz good quality chocolate (I like Scharffenberger 62%)

First, rinse the strawberries. Allow them to dry completely on a towel before proceeding, at least 30 minutes, or the chocolate will not stick.

Line a baking sheet with wax paper. Coarsely chop the chocolate, and melt (my preferred method is in the microwave on power level 3 or 4 for two to three minutes). Holding the stem end of each berry, roll the red flesh in the chocolate evenly, allowing the excess chocolate to drip off. Carefully place each dipped berry on the wax paper. Repeat. (You can of course choose other fruit to dip also; banana is an obvious choice.)

Chill for at least two hours, or up to twelve. They can be served immediately after being taken out of the fridge, but I prefer to let them warm up for five minutes so that the chocolate doesn't crack with your first bite.

Monday, August 30, 2010

Sonoma

Last weekend, B and I went up to Sonoma for a day of eating and fruit-gathering. It ended up being a sunny day in San Francisco that we missed out on, but it was even sunnier and warmer up there. First, we stopped at a great fruit and vegetable stand in Petaluma, and bought some beautiful figs. Then we drove up to the tiny hamlet of Freestone, and stopped to have some fresh, warm fougasse bread and a picnic in the lovely garden adjoining the Wild Flour bakery.

About a mile down the road from the bakery, we stopped again, this time for some blackberry-picking along a particularly fruitful stretch of the Bohemian Highway. Our final stop was at my grandfather's house in Sonoma proper, where we were given some fresh prune plums from his prolific tree to take home.

As you might be able to predict, I've since made three batches of jam (one blackberry and two plum). Fig ice cream was clearly on the agenda too. I also made this fantastic plum galette, which I modified last year with apricots.

The real reason I'm writing this post, though, is to encourage you to find and take advantage of fresh blackberries to make this blackberry frozen yogurt. It is exceptionally delicious and fresh-tasting! However, because it is so easy and relies so heavily on high-quality berries, the recipe fails with store-bought blackberries. So whether you go picking or farmer's-market-ing, make sure you find very ripe, very dark, very sweet berries. And make this frozen yogurt. You won't regret it.

Friday, August 27, 2010

Adventures in Canada

B and I went on a vacation to Alberta last month. I hadn't been to Canada since I went on a family trip to Niagara Falls twenty years ago, but I already can't wait to go back! We explored both east and west from Calgary, and the glaciers and lakes and mountains and waterfalls and wildlife are like nothing I've ever seen.

Did I mention that the wildlife was awesome?


This is a hawk we saw flying not-that-high above in southern Alberta at Head-Smashed-In Buffalo Jump. The name of this UNESCO site pretty much says it all: the Native Americans used to drive buffalo across the plains until they stampeded to their death over this 30-meter cliff. The meat and hides from the dead buffalo lasted the tribespeople through the winter. We ate some buffalo burgers on the trip, but I'm pretty sure they were prepared in a more humane fashion.

On more than one occasion, we had picnic lunches with scenic vistas. Towards the end of our trip, we picked a nice rock overlooking Medicine Lake, near Jasper. (Apparently I can't escape medicine, even on vacation; though I am quite thankful that I haven't yet had a medical emergency develop in a fellow passenger while on an airplane.)


Another highlight, among the many lakes we saw, was Lake Louise, about thirty miles north of Banff. We particularly enjoyed our hike from the waterfront up to the teahouse at Lake Agnes.


People keep asking if this trip was a "babymoon." I guess it was, since it was presumably our last big trip with just the two of us. However, we were also joined by a real, live baby (A, and her parents B&K) for the Banff portion of the trip. She was incredibly interested in practicing her walking, as she prepared to become a toddler instead of a baby.


We stayed in a condo for the Banff part of the trip, which was equipped with a small kitchen. We mostly used the refrigerator and sink, but I had also packed a bag of white powder, a.k.a. a pre-made baking mix to have one morning as a breakfast treat. Unlike on our trip to Wyoming with J and other B, my baggage was not inspected by a suspicious TSA employee, so I thought I was home-free by the time the scone mix arrived in Banff.

After all, making the mix ahead of time was the hard part (and it wasn't even hard). The instructions I'd written on the Ziploc were very easy to follow: "Cut in 1.5 sticks butter, mix in dried cherries, add 1 cup water, and bake at 375 for 20 to 25 minutes." I pre-heated the oven (quite pleased that the dial was in Fahrenheit and not Celsius), found a makeshift baking sheet in the tiny kitchen, formed the scones, and popped them into the oven.

Not five minutes later, the acrid smell of smoke and burning scone filled the loft apartment. Reader, my plans for a home-cooked breakfast on vacation were thwarted by a broken oven dial! After much fiddling of the temperature dial, I learned that although it had tick marks for a normal range of temperatures, functionally it seemed to have but two settings: broil, and off.

B opened the sliding doors to allow for some ventilation, but of course this situation occurred on the coldest day of our trip (and it was cold, even for someone used to summer in San Francisco, with a high that day of around 40). We couldn't keep the condo doors open for too long!

I valiantly attempted to make a second batch of scones with the remaining batter, keeping the oven door propped open to let out some of the searing heat. This batch turned out marginally better, taking a whole ten minutes to cook instead of the aforementioned five (but much less than the typical twenty). B&K, not having had the scones before, thought they tasted good, but B and I knew better, so we picked off the edible top parts from the overcooked bottoms.

I promised K that I would give her the recipe, so here it is. It's pretty self-explanatory, but I would caution her (and you) to be careful of strange ovens. I like scones a lot (we had these ones yesterday with a fresh batch of blackberry jam), and I particularly like Cheese Board scones (like these cheese ones that B loves so much). The corn-cherry scones I made in Banff are also derived from the Cheese Board cookbook, but as with the cheese ones, I've significantly decreased the amount of butter from the original recipe.

When I made the scones again at home, after the trip, I didn't take a picture of the lightly-browned (i.e., not blackened) bottoms, but here's a picture of what the tops should look like. Enjoy!


Corn Cherry Scones

Makes: 12 scones
Time: 15 minutes active, 45 min total

2 c. unbleached flour
1/2 t. baking soda
1 T. baking powder
1/2 t. salt
1 c. sugar, divided
1 1/2 c. cornmeal
1 1/2 sticks (3/4 c.) unsalted butter, cut into 1/2-in. cubes
8-oz. package dried sweet cherries, about 1 1/2 c. (I use the Bing cherries from Trader Joe's)
1 c. buttermilk

Preheat the oven to 375. In a large bowl, mix together the flour, baking soda and powder, salt, 3/4 c. sugar, and cornmeal. Using a pastry blender, two knives, or your fingers, cut in the unsalted butter until it is the consistency of large breadcrumbs. Mix in the cherries. Add the buttermilk, mixing until just combined.

Form dough into balls about 2 1/2-in. in diameter, and place on baking sheet. Sprinkle tops with remaining 1/4 c. sugar. Bake for 20 to 25 minutes, or until tops are golden (and bottoms are not blackened). Cool for at least 5 minutes before serving.

(If making a scone mix for travel, mix together the dry ingredients as above, but also add 4 T. powdered buttermilk. When reconstituting the mix, add 1 c. water in place of fresh buttermilk.)

Sunday, June 27, 2010

"I am delicious"

A few weeks ago, B and I went to DC for a long weekend. Though both of us have visited the capital and environs for various conferences, it had been years since either of us had been there as tourists. His obligatory school trip across the country from California was in eighth grade, and mine in sixth.

My school trip, unlike B's, was cut brutally short by the development of that nasty, highly contagious rash known as chickenpox. It was not a coincidence that the pox had been going around the entire school that May, and my own little brother had gotten it just ten days before we left. About halfway through the trip (we'd already seen Monticello and Mt. Vernon, but had just arrived in DC itself), I saw a few herald spots, felt the beginning of the itch (oh, that miserable itch), and knew the jig was up. I was sent home early. The title of my subsequent scrapbook was "Spotlight on Washington, DC."

On this trip, B and I visited some monuments that we hadn't seen in twenty years.


The Washington monument by night was very impressive, but B and I most enjoyed the ghostly Korean War memorial with the larger-than-life soldiers trekking through the night (the pictures didn't turn out very well, or I would share them with you). The entire memorial wasn't even there the last time either of us visited the Mall! Another landmark we saw on our trip certainly was there twenty years ago, but, not surprisingly, wasn't pointed out to us by our teachers.


Yes, there it is. That's the infamous Watergate complex! We saw it from a boat cruise we took down the Potomac from Georgetown to Alexandria.

The real purpose of our trip, however, was to visit family (my brother—the very same one who gave me chickenpox—and his girlfriend) and friends. In addition to sight-seeing, we ate at lots of great restaurants, cooked in E&T's beautiful kitchen (just one room of their beautiful house in their beautiful neighborhood), watched some French Open tennis, and, because the hot weather had just arrived for the summer, appreciated the air-conditioning.

One time when we were cooking, or discussing cooking, the subject of tamarind came up. It turns out that both my brother and my friend E have had major difficulty locating tamarind paste in this large, multicultural, cosmopolitan city in which they live. It's not even available at their Whole Foods. And, as anyone who has cooked with tamarind before knows, the paste is a huge shortcut. Tamarind is also available in its original seed pods at some Asian markets, or in blocks made from the innards of the seed pods. However, in order to be usable, the blocks must be softened in hot water, and then laboriously pressed through a strainer to separate the fibrous waste from the delicious, tangy, dark-brown tamarind juice. It's a real pain.

All the discussion about tamarind made me excited to return home, where tamarind paste is easily available, so that I could make one of my favorite recipes. I bought three tubs of paste at an Asian market in the Richmond: one for me, one for E&T, and one for my brother. I didn't mail them until a few days ago, though, so that's why I couldn't post earlier in the month and thereby torture them with a recipe that would make them salivate.


B loves this recipe. One time he went through my Gourmets until he found this one, and affixed a sticky note onto the cover: "I am delicious." Each component is delicious on its own, but what makes the recipe special is how well they all work together. The Thai-inspired tamarind shrimp top an avocado and cilantro base that represents the best of California cuisine. The shrimp and avocado are in turn served over rice, and finished with sauteed shallots. Everything combines to make a dish worthy of company—if you're willing to share it, that is.

Though some of the reviewers on Epicurious despise the brown color of the tamarind sauce, I think one of the best parts of the dish is how colorful it is, from the white rice to the green avocado to the pink shrimp. The very best part, of course, is the taste, and the tang of tamarind paste is a major contributor.

Now that E and my brother have tamarind paste on the way, they're all set to make this recipe, since that's really the only non-standard grocery ingredient. The dish is perfect for summer, and writing about it makes me wish it were on the menu for this coming week. I think you'll like it too. Enjoy!


Tamarind Shrimp with Avocado
Adapted from Gourmet, April 2005

Serves: 4, generously
Time: 35 minutes active and total

2 large avocados, peeled, pitted, and chopped into 1 inch dice
1/4 c. cilantro, chopped
juice from two limes, divided
2 T. tamarind paste
1 T. soy sauce
1 T. fish sauce
1 t. sugar
3-4 T. vegetable oil
3 shallots, sliced crosswise and separated into rings
2 cloves garlic, minced or smashed
1 inch ginger, peeled and minced
1 serrano chile, seeded if desired and minced
1 1/2 lb. uncooked shrimp, peeled and deveined (I use the 31-40/pound frozen shrimp from Costco)
cooked Jasmine rice (I use 1 1/2 c. uncooked rice)
1/4 c. peanuts, toasted and chopped (optional)

First, mix together the avocado, cilantro, and juice from one lime in a small bowl; set aside. In another small bowl, mix together the juice from the remaining lime, tamarind, soy and fish sauces, and sugar; set aside.

In a medium-sized saute pan, heat 3 T. vegetable oil over medium-high heat until hot but not smoking. Add the shallots, and saute until lightly browned. Using a slotted spoon, remove the fried shallots from the pan and drain on a paper towel (I usually lightly salt them).

Using the same saute pan, add the garlic, ginger, and chile (adding another tablespoon of vegetable oil if necessary). Stir for 30 seconds, or until fragrant, and then add the shrimp, tossing frequently for two minutes until evenly pink. Add the tamarind sauce, and cook for another two minutes, until shrimp are just cooked through.

Place 3/4 c. cooked rice on a plate, then top with avocado mixture, shrimp and tamarind sauce, and fried shallots (and peanuts if using). Serve immediately.

Wednesday, June 9, 2010

Summer is here

This is going to be a short post, without a recipe. I do have a recipe that I want to share with you in the next few days, but I want to tell you about something else today. It's still edible, so I think it belongs in this blog.

Perhaps the best part of summer (besides the grilling and the sunshine, neither of which we have in abundance in our apartment in San Francisco) is the fresh fruit. The strawberries have been phenomenal for weeks at this point. Yesterday, B and I just got our first delivery from our new CSA (straight to our doorstep!), with beautiful peaches and blueberries and melon. And don't get me started on the cherries; I love the cherries.

And today I got another delivery: an egg carton by overnight mail. An egg carton filled with the first apricots from my parents' trees, that is!


Aren't they beautiful? The egg carton is the perfect size to hold these little gems. I've told you before how much I love apricots. How could I not? The apricot-adoration has been generationally ingrained into me, after all.

There are many ways to prepare apricots (jam, ice cream, pie, to name but a few), but these specimens will be sliced, pitted, and eaten fresh. I'll eat most of them, but B will do his fair share as well. We can't wait.

Thanks, Mom!

Thursday, May 27, 2010

Anniversary

Last week, B and I celebrated our third wedding anniversary. And, for the third year in a row, we had a special dinner at Chez Panisse. I think I might say this every year, but I really believe that this was the best dinner we've had there. It was as though all of my springtime favorites were combined in one delicious meal! (Also, the company was very nice.)


Can you read the menu? I'll tell you about the most delicious parts, which were the beginning and the end. We started with a fritto misto of artichokes and asparagus. Wow. Just wow. Who knew that Alice and her chefs knew how to fry so well? The spicy arugula salad and the aioli on the plate cut any heaviness from the fried vegetables. Everything in the middle was delicious too, but we ended with a tartlet filled with strawberry-rhubarb ice cream, and topped with a truly lovely meringue. The "Happy Anniversary" banner you see in the picture adorned our dessert plates. Needless to say, not a speck of food was left on our plates at the end of each course.

Our three years of marriage are only part of the seven years that B and I have been together, and we know each other pretty darn well by now. There was a time when we didn't, however hard that is for us to imagine now. B did not entirely understand my devotion to the culinary arts when we met (though, for the record, I was not nearly as good a cook back then). As I've probably told you before, he described me as being "from scratch" in the kitchen. When we met, I was in medical school, living in an apartment on my own. B, on the other hand, was living and working as a consultant in San Diego, but technically working out of his company's office in San Francisco. This state of affairs meant that he had a per diem allowance, and ate out three meals a day! I preferred (and still prefer, when feasible) to cook three meals a day.

So, one morning when B and I did not know each other very well, I was casting about in the kitchen trying to find something to make for breakfast. I came across some blueberries in the freezer, and asked B how he would feel about having blueberry muffins for breakfast. He agreed that they sounded good. And then, after looking around the kitchen a little more, I reneged on the offer. Why?

We had no lemons to make lemon zest!


Lemon zest is a critical part of the following blueberry muffin recipe. Let's just say that in those few crucial minutes that morning long ago, B had fallen in love with the idea of blueberry muffins for breakfast, and did not entirely understand how lemon zest could be so crucial to their success. And, because B didn't know me very well, he wanted me to still make the muffins without the lemon zest. This did not happen. Though I don't remember what we ended up having to eat that morning, it was NOT blueberry muffins.

I guess I also don't entirely understand why the lemon zest is essential (other than that blueberries and lemons pair beautifully together), but it is. The lemon zest and sugar mixture that tops each muffin becomes a crunchy-sweet component to each bite. The muffins are studded with berries, ensuring fruit in every mouthful. As I alluded to, frozen blueberries work just as well as fresh. There is no need to defrost; however, you must be very careful to mix only as much as needed to fold the frozen berries in, because otherwise you'll end up with batter of an unappetizing gray shade.

Since there's only a half-stick of butter for 12 muffins, I feel no compunction about having mine with a pat on top of each slice, but health-conscious B prefers them plain.


I told B I was going to write about the lemon zest story, and he laughed. I've worked my kitchen magic over the years, and now he understands how important the lemon zest is. Hopefully you'll understand too. Here's to many more zest-filled years together! Enjoy.

Blueberry Muffins
From the Sacramento Bee sometime in the 1970s

Makes: 12 muffins
Time: 15 minutes active, 45 minutes total

zest of 1 lemon
1/2 c. sugar
1 1/2 c. flour
2 t. baking powder
1/2 t. salt
1 egg
1/2 c. milk
1/4 c. (1/2 stick) butter, melted
1 c. blueberries (fresh or frozen)

Preheat the oven to 375, and line 12 muffins cups with muffin liners. In a small bowl, mix together the lemon zest and 2 tablespoons of the sugar. In a medium bowl, mix together the remaining sugar, flour, baking powder, and salt. In another bowl, combine egg, milk, and melted butter. With several quick motions, mix wet ingredients into dry. Fold in blueberries. Drop batter into muffin cups. Sprinkle tops evenly with lemon sugar. Bake for 20 to 25 minutes, or until lightly browned. Serve warm.

Wednesday, May 19, 2010

My favorite kind of beer

Third year of medical school is really hard. From the incubated cocoon of the first two years, spent almost entirely in the classroom, one is thrust (without adequate preparation; though in retrospect what really could or would constitute adequate preparation?) into the fast-paced, hospital-based world of the wards. It's pretty different, and I don't like change very much to begin with (though JB probably likes it even less).

I was thinking about third year of med school a lot last month while I was in the ICU at our county hospital. The dearth of new blog posts in April was because the ICU was every bit as busy and tiring as I had thought it might be. (The dearth of blog posts in May has no such reason behind it. Sorry.) Similar to last month, third year of med school is busy and tiring. Instead of having weekends off and knowing what you're supposed to study and know, you are bossed around, unable to make plans because your schedule is no longer your own, and saddled with the realization that you've worked hard for two years but don't know anything about actually taking care of patients. This fugue state ultimately improves, but not without persisting for a while.

On my core general surgery rotation, the second rotation of my medical school career, I learned a lot. First and foremost, I learned how to retract. I learned how to work on a team, or, as my chief put it one time, how to play well in the sandbox. I also learned how to respond to pimping (wishing all the while that I'd paid more attention in gross anatomy), and how to stay up all night (complete with 3am pre-rounding). I even began to learn how to take care of patients. Nonetheless, I frequently came home grumpy, and exhausted, and convinced that I did not want to be a surgeon when I grew up.

My solace during these rough transitional two months? It was simple and delicious and satisfying: root beer floats.


I would come home after a long night, eat some cereal, watch a Tivo'ed "Jeopardy!", and quickly fall asleep on the couch. In the early afternoon, I would wake up starving, and then it was time for a root beer float. I started with two or three scoops of ice cream in a pint glass, and then added some root beer, poured carefully down the side so that it wouldn't get too foamy after mixing with the ice cream. I then slurped some root beer through a straw, ate a few spoonfuls of ice cream, and poured in some more root beer; this regimen was repeated until the glass was empty and my belly was full. I drank enough floats that I even bought reusable, dishwasher-safe straws to decrease the waste.

Little did I know what a transformative rotation surgery would end up being. I started a number of post-call traditions during those two months, including the "Jeopardy!" and the couch-sleeping. The afternoon root beer floats, though initially popular, fell by the wayside about a year later, well before I started residency and its plethora of long nights in the hospital.

Only recently (with B's assistance) did I realize why I stopped drinking floats: the summer following my surgery rotation brought the delivery of our ice cream machine. Though the advent of the ice cream machine brought many new and delicious flavors into our freezer, making vanilla seemed, well, too vanilla. Why not make salted caramel? Or fig? Or mint chocolate chip? They were quick variations on the vanilla base, and seemed a little more special than a flavor so easily available at the grocery store. And so, without vanilla ice cream at hand in the freezer, root beer floats quickly became a distant memory.

Thank goodness, then, for the ICU-induced stress so reminiscent of third-year medical school. Without it, I would never have come back to root beer floats. I don't think they need homemade ice cream to be delicious, but they definitely need top-notch root beer. While my family used to be IBC die-hards, we have since moved to the Virgil's camp. The best price and availability are at Trader Joe's.

I don't think this post will convince anyone to go to medical school (it's not that bad, really, I swear), but maybe it'll convince some of you to try root beer floats again. They're not just for kids, and they sure do hit the spot when you come home from the hospital after a long day or night. Enjoy!


Root Beer Float
Time: 5 minutes active and total

3 scoops of high-quality vanilla ice cream (you can make your own, or use a premium brand like Haagen-Dazs)
12-oz bottle of cold root beer (Virgil's is my favorite)

In a pint glass or tall soda glass, place three scoops of ice cream. Add root beer slowly, down the side of the glass, to avoid foaming. Serve with a long spoon, a straw, and the bottle with any remaining root beer.

Wednesday, March 31, 2010

Citrus

Somehow, March has shaped up to be like January. Uninspired, that is, at least in terms of this blog. I have to explain to you a few things: I'm not sure how that happened (again!); I'm sorry; and I don't want it to happen in the future. And so, on this last day of the month, I'm going to cram in one more post. Hopefully another one will follow in the next few days, as I already have the topic and a picture. I can't make any promises, though. Thursday (tomorrow) is a D-day of sorts since I will start in the ICU at the county hospital for a month. To call it an intense experience would be an understatement.

Today, I want to tell you about something I made last month. (I literally must write about it this month, or else it will be really, really old news; I'd be telling you in April about something I made in February!) It's one of those gifts that keeps on giving, the sort that are really important for a busy cook who needs to have pantry and freezer staples around for use at a moment's notice.

This recipe also takes advantage of the season. Winter and early spring are a really awesome time for citrus. We have been enjoying so many delicious types of citrus lately! I've had the privilege of eating some very sweet tangerines, and on ambitious mornings I juiced some navel oranges harvested from my grandfather's trees (until I ran out). The novelty of the balanced sweetness and acidity in a really good orange makes you understand why they used to be the only present the Little Women would receive at Christmastime. Good citrus can be revelatory.

In addition to the store-bought citrus, I had the excitement in February of receiving a large harvest of kumquats. My mother-in-law has a dwarf, but quite prolific, kumquat tree; better yet, though, she has friends with a 20 foot tall kumquat tree. I've never seen this impressive specimen, but I've tasted its bounty for the past two seasons. Apparently the deliveries I receive of freshly-harvested kumquats, which seem like large amounts, hardly put a dent in the fruit borne by the tree.

Both last year and this, the kumquats were used up quickly. A came over, and we made two batches of straight up kumquat marmalade. We also had shrimp and kumquat skewers, which were delicious and which I should definitely share with you on this blog sometime. Two batches of marmalade, and skewers for four, and a party favor Ziploc filled with kumquats for A&K only used up half of the fruit we had in the refrigerator.

It was time to make kumquat Earl Grey marmalade.


Making jam of any sort is ever so satisfyingly concrete. Making jam this beautiful (I mean, it's actually glowing, at least in the picture above) also fulfills an inner desire for creating lovely things.

Did I mention that it's tasty? The Earl Grey isn't necessary, but the orange flavor of the bergamot enhances the kumquat and makes for a great marmalade. A great marmalade, by the way, should include the proper proportions of sweet, tart, and bitter; most marmalades, to my taste, are too heavy on the bitter. This marmalade is perfect on a slice of lightly-buttered toast, and I think it would be wonderful as a sophisticated appetizer with a slice of Brie on a water cracker.

To make the marmalade in any decent quantity requires boiling-water canning. As I've written about before, the process sounds much more intimidating than it actually is; any interested locals are encouraged to e-mail me for a private lesson. I've only taught two people (A and C), but they are now both successful independent canners who have branched out on their own and shared their delicious creations with me.

What's harder than the canning (or at least more of a pain) is the preparation of the kumquats. These squirrelly little fruits hide seeds like nobody's business; one big seed if you're lucky, or a number of tiny ones if you're not. While you're slicing the kumquats crosswise into pinwheels, you'll spend a fair amount of time picking out seeds. It's time-consuming, but totally worth it for the beauty of the final jam. Oh, and not to worry if you don't have access to your own personal kumquat supplier like I do; the supermarket ones, as long as they're not soft (and therefore verging on spoiling), are perfectly acceptable.

Certainly during this busy upcoming month in the ICU, I'll need to prepare breakfast on the go. It's a good thing I have plenty of kumquat marmalade to spread on toast. Whether you eat it for breakfast or otherwise, enjoy!


Kumquat Earl Grey Marmalade

Makes: 6-8 half-pints (the first picture above was about 1 3/4 batches)
Time: 1 hour active, 1 hour and 15 minutes total

4 c. sliced kumquats
1 c. strongly brewed Earl Grey tea
1 package Sure-Jell pectin
6 1/2 c. sugar
1 t. unsalted butter (optional)

Slice the kumquats thinly crosswise, removing seeds as you cut; each kumquat should be sliced into about four or five pieces. Add the kumquats, tea, and pectin to a large pot. Heat on medium until mixture reaches a rolling boil. Add the sugar, all at once, and bring mixture back to a rolling boil. Add butter to decrease foaming, if desired. Cook at rolling boil for one minute, then remove from heat.

Ladle marmalade into jars that have already been boiled for 10 minutes to sterilize them. Top with fresh seals that have been soaked in boiling water, and place rings finger-tight on jars. Process for ten minutes in boiling water canner. Make sure each jar seals; if it doesn't, re-process in boiling water canner with fresh seal.

Monday, March 1, 2010

Breakfast in five minutes or less

A lot of breakfast items can be prepared really quickly. Fast-paced lives demand fast-paced foods, I guess. Cereal, probably the most frequently eaten breakfast food around our house, falls into the "breakfast in one minute or less" category. It's not a very complicated recipe: pour some Honey Bunches of Oats into a bowl, top with fruit, add a splash of milk, et voila! The eating certainly takes longer than the preparing.

However, in the way that I nearly always prefer a hot lunch to a cold one, I'm often in the mood for something hot for breakfast. This can take the form of scones, or popovers, or pancakes, but the first two of that list take about an hour from start to finish. That's OK for the weekend, but that time commitment isn't really practical for the week. (And you know that I'm all about a practical kitchen.)

It was in this hot-breakfast-mindset, then, that I first became intrigued by RK's version of a breakfast egg sandwich. She told us about it a couple of months ago. She cracks an egg into a mug, breaks up the yolk with a fork, puts the mug in the microwave for a minute, and then eases the cooked egg out onto an English muffin.


The egg comes out of the mug, she said, in the perfect shape for an egg sandwich on an English muffin. That it most definitely does.

What RK didn't share with us, though, was that the egg sometimes makes little exploding noises before a full minute has elapsed in the microwave. Those exploding noises are generally accompanied by corresponding exploding bits of egg. All over the microwave. A kitchen explosion (and the subsequent clean-up) doesn't seem like the best way to start the day, especially for a recipe that's supposed to be quick and easy.

I really, really wanted this one-minute technique to work, though, so I've played around with it a few times. I think everyone's microwave is a little bit different, and I can cut down on the exploding significantly by taking my egg mug out after only fifty seconds. Also, the choice of mug seems to make a big difference, which may relate to something about the composition of the ceramic.

A few days ago, still obsessed with minimizing the exploding mess, I thought I had the most brilliant inspiration of all: I would rip off a piece of aluminum foil, and lightly cover the mug with that before placing it in the microwave. Any errant egg bits would be captured by the foil. As I placed the foil on the mug, though, I (thankfully) remembered the small Microfridge fire I'd started sophomore year of college. Back then, I had put a small paper take-out container of leftover Chinese food, complete with a metal handle, straight into the microwave. It didn't take more than 30 seconds for the paper to light on fire where the metal inserted into the sides of the container! Oops. With that memory as my guide, I took the foil off the mug, and resigned myself to a few small explosions.

If you're scared of errant egg bits, and you have a few extra minutes, you can also pan-fry the eggs overeasy to make a really satisfying egg sandwich. That's how B and I used to do it before we heard about the microwave technique (and how we still do it when making more than one sandwich at a time, which is frequently, since B often eats three in a row). Either way, make sure to put some cheddar or Jack cheese on top. With the mug technique, sprinkle slivers of cheese over the egg right after it comes out of the microwave, while it's still hot; for the eggs in the frying pan, put cheese over the eggs right after you flip them. Melty, gooey cheese is the absolute best.

I like my English muffin toasted, which you can do while the eggs are cooking, and I also love avocado on top. You can add a splash of hot sauce if you like, but the sandwiches are also great with any salsa you might have lying around in the fridge.

Quick, easy, and flavorful; just what I like in any meal! I'll admit that these egg sandwiches are a relatively frequent post-call lunch for me, when I arrive home after thirty hours in the hospital. I think you'll like them too, whether for breakfast or for a breakfast-y lunch. Brave the explosions if you dare, or just go for overeasy eggs in the frying pan. The recipe below includes options for both. Let me know if you experiment with the microwave technique and find a way to minimize the exploding egg bits...without causing sparks or fire in the microwave, of course. Enjoy!


Egg Sandwich

Serves: one
Time: 5 minutes active and total

1 English muffin, split
butter (for greasing the skillet, if pan-frying)
1 egg
slivers of Jack or cheddar cheese
salt, to taste
several slices of avocado (optional)
dollop of salsa (optional)
hot sauce, to taste (optional)

First, start toasting the English muffin (if desired). Then, cook the egg.

For the microwaved egg: crack the egg in a mug, break up the yolk with a fork, and place in the microwave for 45 to 60 seconds, until white is not runny. Place cheese slivers over the hot egg in the mug.

For the pan-fried egg: heat a small skillet over medium heat; swirl the butter until melted, and then crack the egg into the pan. Lower the heat to medium-low, and cook the egg until the white is mostly set (approximately two minutes); then flip and cover with cheese. Cook until cheese is melted, approximately one to two minutes more.

Ease the egg onto the English muffin. Top with salt, avocado, salsa, and hot sauce to taste. Serve immediately.

Tuesday, February 16, 2010

Valentine

I'm not usually big on Valentine's Day. It's not that I don't love B; I do, very much! The holiday itself, though, is sort of overrated, often just providing a chance for restaurants to charge exorbitant amounts of money for not very exciting food. Hallmark, of course, sets up unreasonable "romantic" expectations for any couple.

Sometimes, though, I succumb to the holiday vibes. I think this might be related to the fact that my favorite color was pink throughout elementary school. (This was before princess culture had gotten totally out of control.) I very much enjoyed both the giving and the getting of Valentines, and usually labored over an arts and crafts project plus/minus a baking project for my classmates. But I date myself. Apparently, in this day and age of the childhood obesity epidemic, baked goods are forbidden in many schools.

A few days ago, in honor of this heart-shaped, red-roses-and-chocolates-filled holiday, I put on (and am still wearing) heart-shaped earrings. One year I got B boxers covered in hearts. More recently, I've steered toward an edible celebration of Valentine's Day (though my goal has not been an aphrodisiac). Last year, I made this very sophisticated and very easy cake in a heart-shaped pan I have. (I confess without embarrassment that I own a heart-shaped pan, but I must emphasize that I inherited it from my grandmother and did not purchase it on my own.)

And this year? I was inspired to make red velvet cupcakes in honor of R's birthday, and secondarily Valentine's Day.


They turned out very, very red. This was partially (O.K., completely) due to the fact that I added twice as much food coloring as the recipe called for. You see, I made a red velvet cake several years ago that called for three (three!) bottles of food coloring. Since this seemed excessive, I purchased but one bottle of red food coloring at the store last week. After I added the whole bottle, and after the batter turned a very deep shade of red, I reread the recipe and realized that I had doubled the desired amount. Oops. Too late to turn back, so I plunged ahead.

My late grandmother (she of the heart-shaped pan) used to color all sorts of cakes and frostings...in the sixties. A residency colleague of mine went through a phase where she only ate green food, so her parents were forced to use green food coloring to get her to drink her milk...in the eighties. Food coloring seems awfully dated now, doesn't it? Useful for Easter eggs, of course, but it does not occupy a prominent position as a go-to pantry item.

Many of the red velvet recipes I looked through commented on how the recipe was an old Southern tradition, but I wondered when food coloring, such an integral part of the recipe, actually originated. The answer, as it turns out, was quite some time ago. Apparently the Romans really liked the yellow color imparted by saffron. And before red food coloring was regulated by the U.S. government, those enterprising Southern cooks used beet juice. I even came across one carrot cake-like recipe for red velvet that used shredded beets.

Thank goodness for red food coloring! This time, I was even able to purchase it stand-alone, without those pesky yellows and blues and greens left to languish in the back of the cupboard. The simple buttermilk cake that forms the basis of red velvet becomes unique with the addition of a few tablespoons of cocoa powder and a few tablespoons of food coloring. What really makes it special, though, is the cream cheese frosting (which I love, and which I've already written about). Besides the delicious flavor, the contrast between the red cake and the white frosting is very pleasing.

These cupcakes were perfect for the birthday party, the leftovers were perfect for Valentine's Day, and future incarnations will be perfect for other special occasions. Enjoy!


Red Velvet Cupcakes

Makes: 24 cupcakes
Time: 45 minutes active, 2 hours total

For the cupcakes:
1 stick (1/2 c.) unsalted butter, softened
1 1/2 c. sugar
2 eggs
1 c. buttermilk
1-2 T. (1/2 - 1 oz.) red food coloring
1 t. vanilla
1 t. distilled white vinegar
2 T. unsweetened cocoa powder
1 t. baking powder
1 t. baking soda
1/2 t. salt
2 1/4 c. cake flour

For the frosting:
12 oz. (1 1/2 packages) light cream cheese, at room temperature
3/4 stick (6 T.) unsalted butter, at room temperature
1 t. vanilla
2 1/2 c. powdered sugar

To make the cake, preheat the oven to 350 degrees. Line 12 muffin cups with cupcake liners. In a large bowl, cream together butter and sugar. Add the eggs, one at a time. In a separate small bowl, add the buttermilk, food coloring, vanilla, and vinegar.

To the large bowl, add the cocoa, baking powder, baking soda, salt, and 3/4 c. flour. Mix well. Add half the buttermilk mixture, mix, add 3/4 c. flour, and mix; repeat with remaining buttermilk mixture and 3/4 c. flour. Batter will be a deep red color.

Fill muffin cups 3/4 full with batter. Bake for 18 to 20 minutes, or until a cake tester comes out clean. Once cupcakes are cool enough to transfer to a rack (about five minutes), place new cupcake lines in muffin tins. Fill with remaining batter, and bake. Allow cupcakes to cool completely (about one hour) before frosting.

To make the frosting, beat cream cheese and butter together in a medium bowl. Add vanilla and powdered sugar. Frost each cupcake generously. Cupcakes can be made 24 hours ahead of serving if stored tightly covered.

Tuesday, February 9, 2010

Rocket

Last Saturday was one of those capricious weather days of San Francisco; it started rainy and dreary, but ended sunny and blue. When I awoke that morning, I had a sick husband in bed, a paper to edit, and the aforementioned rain endlessly pounding on the skylight. It didn't seem like an auspicious start to the day.

By lunchtime, however, things were looking up. B was out of bed, though still coughing every time he took a deep breath (and sometimes coughing just spontaneously). The paper was edited (one draft, at least), and I'd started on a long list of chores for the day: laundry, straightening up the house, picking up the dry-cleaning, grocery shopping, and making the peppermint meringues for an ultimately disappointing cake. I'd also fixed a nice brunch for me and B, with cheese scones and an insalata tricolore. He was well enough to partake by that time, downing four scones without a problem.

The scones I've already told you about, and they were as good as usual, so today I want to tell you about the insalata tricolore. This devastatingly simple salad is complex and delicious. The salad items are awfully patriotic (if you're Italian, that is), with appearances by each of the three colors of the Italian flag (green arugula, white Belgian endive, and red radicchio).

And by arugula, I mean rocket. Rocket! Isn't that a funny name for a salad green? I lived in England for a year right after college, and besides drinking a little bit too much and rowing intramural crew and meeting lots of new people from around the world, I immersed myself in British vocabulary. I of course learned the standards: boot, lorry, lift, jumper. But what I found most poetic were the British names for vegetables. Rocket I've mentioned, but did you know that zucchini are called courgettes? Or that eggplant is known as aubergine? I like eggplant now, but I despised its slimy nature and numerous seeds when I was younger; my dad swears, however, that if eggplant had been known as the more romantic, mellifluous "aubergine" in our house, I would have grown up liking it. Too bad we'll never know, since the names aubergine and rocket are pretty much confined to the other side of the Atlantic.

The rocket salad, if you will, is inspired by one at Pizzeria Delfina, a restaurant I very much enjoy (and which has previously provided inspiration for posts on this blog). There are only two differences that I can detect between their salad and mine. First, their chefs have perhaps better knife skills than I do (and perhaps more patience), and the radicchio and endive are sliced into very fine ribbons. Second, the salad components are served separated by color, making the flag resemblance even stronger, before being all tossed together.

The salad works really well at dinner, with pasta or panini, and I know now that it makes a great brunch with cheese scones. It's tangy from the lemon in the dressing, and flavorful from the slightly bitter greens and salty Parmesan. By later in the day Saturday, the sky had turned blue with flecks of cumulus clouds, B's cough was at least partially controlled by Ricola, and our bellies were full of hearty cheese scones and lighter insalata tricolore. Enjoy!


Insalata Tricolore
Inspired by Pizzeria Delfina

Time: 10 min active and total
Serves: 2

2 cups arugula
1 head Belgian endive, ends discarded and thinly sliced crosswise
1/4 head radicchio, cored and thinly sliced
juice from half of a lemon
2 T. olive oil
1/4 t. salt, or more to taste
1/4 t. dried oregano (optional)
Parmesan shavings

Add arugula, endive, and radicchio to a salad bowl. In a small jar, mix together lemon juice, olive oil, salt, and oregano (if using); cover, and shake vigorously to emulsify. Dress salad with lemon juice mixture, and toss. Top with Parmesan shavings for serving.