Tuesday, July 28, 2009

Afternoon snack

Everyone in the family likes ice cream. B likes it, I like it, Jackson and Jasper like it. (The cats don't get their own servings, but they do enjoy licking the bowls when we're done. Jackson, however, only likes licking bowls that don't have spoons in them; for some reason he is irrationally scared of utensils.) Jackson spends a lot of time in the kitchen with me; in addition to tasting the ice cream, he likes watching the machine while it's churning.


He is endlessly fascinated, and will perch there for the entire thirty or so minutes that the machine is whirring away—which is frequently, because right now in the freezer we have:
  • espresso ice cream
  • Earl Grey tea ice cream (JL and A got to choose if they wanted coffee or tea after dinner last week, but they semi-cheated and chose both)
  • peach frozen yogurt
  • blueberry ice cream
  • honey-pistachio ice cream
  • strawberry ice cream
  • Meyer lemon ice cream
Wow. That list makes me sound like a crazy person. Or more specifically, a crazy person with the one specific problem of making too much ice cream. Perhaps they'll add this disorder to the forthcoming DSM-V (thoughts, JB?).

But there are still so many flavors to try! I actually can't believe what I'm about to write, but we've had the ice cream machine for over three years and, when you count it up, four of the seven bulleted flavors above are first-run batches. (Even more remarkably, only one of them, the honey-pistachio, was a disappointment; soon I'll be sacrificing the remnants, because it's time to liberate some Tupperware.)

It's not just making ice cream that's a problem, though; there's also the eating. The amount of ice cream we have in the freezer reminds me of an interaction I had with an attending physician in clinic a few months ago. Before I went into a patient's room, he said, "Make sure you ask Mr. A how he's doing on his new diet. Last time I saw him I found out that he was eating ice cream for dessert three or four times a week—isn't that ridiculous?"

"TOTALLY ridiculous!" I agreed, lying through my teeth.

(My weight's stable, I swear. So is B's.)

This post wasn't supposed to be about ice cream, believe it or not. I meant to write about something that goes very well with ice cream but is not itself ice cream. As you might expect, we often serve ice cream for dessert when we have guests over. I like baking, but some of the unusual ice cream flavors would compete negatively with a pie or a tart or a cake. I've been looking for something that would complement ice cream without distracting from it, and this afternoon I did: the stalwart almond macaroon. I had forgotten how much I love macaroons. Chewy, sweet, airy, bite-size, perfect.


The idea of pairing them with ice cream wasn't really mine. I happened to be reading the summer fruit section of Lindsey Shere's Chez Panisse Desserts (lots of ice creams in there, so clearly it's not just me that's obsessed), and she recommended serving one of the frozen desserts with macaroons on the side. It had been years since I had made a macaroon. I remember using a Julia Child recipe once (by the way, so excited to see Meryl Streep), but for some reason macaroons had fallen off my cookie-making radar. It seems like everyone adores coconut macaroons, but I prefer to stick with the nut variety since saying that I don't love coconut is putting it mildly.

Today seemed like the perfect day to experiment with macaroons, because I was trying to procrastinate from doing research; after all, you can only spend so many hours a day staring at tables in Excel. First, Wikipedia taught me that the word macaroon comes from the same root as macaroni (weird, right?). Then, I got down to business. I ground nuts, I whipped egg whites (finally, a use for some of the whites generated in the ice cream custard-making process), I folded, I piped rounds onto the Silpat, I baked for seven minutes, I watched the macaroons deflate and wrinkle quickly once out of the oven, I peeled them off the Silpat, and then I ate my afternoon snack.


The macaroons were delicious with a glass of iced tea. I will eat the macaroons with ice cream later, and I'm sure they'll go perfectly. Truth be told, I may have already tested this theory with a spoonful of blueberry ice cream spread lavishly on top of a macaroon; it may have been so delicious that I had to wash the spoon quickly so that I couldn't fix another one and thereby spoil my dinner. Next time, I'm going to enter uncharted waters: hazelnut macaroons, and possibly some sort of ice cream sandwich. For now, enjoy these macaroons, with or without ice cream!

Almond Macaroons

Makes: 36 cookies or so
Time: 10 minutes active, 30 minutes total

1/2 c. sliced almonds
1 c. powdered sugar
2 egg whites
1/4 t. cream of tartar

Preheat oven to 400. Line two cookie sheets with Silpats or parchment paper (both work equally well). Grind the almonds in a food processor (I used my mini-Cuisinart), or finely chop. In a medium-sized bowl, mix the almonds and powdered sugar together. In a separate small bowl, beat the egg whites with cream of tartar until stiff peaks form, about five minutes. Fold the egg whites into the almond and powdered sugar mixture. Place mixture in a pastry bag with a half-inch tip. Pipe rounds about 1 inch in diameter, spaced 1 1/2 inches apart, onto the lined cookie sheets.

Bake for 7 to 8 minutes, until puffed and light brown. Cool for at least 10 minutes before peeling each cookie off by bending the Silpat or parchment paper back. (If you discover that it is very difficult to peel the cookies off, they may not be cooked enough; pop them back into the oven for another 2 to 3 minutes.) Cookies will stay for several days in a sealed container.

Friday, July 24, 2009

Thumper

[Scene: A small Palo Alto apartment complex, in the middle of the day, about three years ago. MB and B sit on the couch in a first floor apartment, laptops on laps, working away. B turns his head quizzically to the ceiling, clearly wondering what is causing the noise that has begun to emanate from above.]

Thump. Thump. Thump. Thwack!

Silence, lasting only ten seconds or so.

Thwack! Thump. Thump. Thwack! Thwack!

Silence. Blessed, blessed silence. It only lasts for a few short (though savored) seconds.

A similar pattern repeats itself. After an hour (an hour!), B decides that we really can't live with this unbearable noise anymore. It is impossible to concentrate on anything! He goes outside, walks upstairs, and knocks on the back door of the apartment of our upstairs neighbors.

What could they be doing? They're often a little loud, but that can easily be explained by the fact that there are four people spanning three generations crammed into a two bedroom apartment. We've joked about whether they're moving furniture up there when they're being particularly loud. And we know they are a little odd, because they seem to think that the communal recycling bin for our five apartment complex is actually a "re-use" bin. B and I have discovered, and subsequently transferred, among other items, a comforter splitting at its seams and a microwave oven to the appropriate (garbage) bin. Loud and odd are one thing, but this ceaseless thumping noise is quite another.

The door to the neighbors' kitchen opens. B starts to say, "I'm really sorry, but is there any way you could..."

His voice trails off as he sees the thirteen year-old boy standing at the kitchen counter with a meat tenderizer in one hand, and a huge pile of pounded meat at his side.

"No problem," the thirteen year-old boy says in his slightly Eastern European-accented voice. "I was almost finished." He resumes thumping and thwacking. His grandmother sits at the kitchen table, looking on; doubtless she'll be responsible for cooking the meat later in the evening. Incredulous, B returns downstairs, his mouth agape.

[End scene.]

We all have our stories about noisy upstairs neighbors, right? In medical school, I used to live below someone who would clip-clop around in high heels every single Friday night before going out. I had a roommate in college who would clunk around in clogs on a daily basis. She told me she preferred to wear shoes in our common room so her feet wouldn't get dirty (surprisingly, she never wanted to help sweep the floor); it was bad enough for me and JB, but I can't imagine what it was like to live below. Loud shoes are one important cause of downstairs neighbor dissatisfaction; thus far, though, I've only heard one instance of meat-pounding causing a neighborly complaint.

B and I live on the top floor now. We try our best to be respectful of our downstairs neighbor (and not just because she knows about this blog), but the wood plank floors can be squeaky, and I can't imagine what the tearing around of the cats at their 10pm witching-hour sounds like from below. At least the cats spend a lot of time asleep, though, or in blinky half-asleep mode like Jasper here.


Concerned about making noise, and not having a meat tenderizer, I only recently made my first foray (ever!) into meat pounding. I used a rolling pin, which was perfectly adequate. Now that I'm an expert meat pounder, I think back to our old upstairs neighbors and I can't imagine why their prep was so loud and why it took so long.

It seems like chicken schnitzel is everywhere these days, and the chicken needs a little tenderizing for maximal breading-and-frying success. I saw this recipe a little while ago, which is the basis of today's recipe, and then my cousin-in-law wrote about this one recently.

Prepared this way, the chicken is perfectly crispy and delicious! It's sauteed in olive oil, so it can't be too terrible for you, right? The chicken needs salt (easy enough to sprinkle on top) and acid, which you can get by squeezing fresh lemon over the top and/or by using the caper sauce I invented the second time I made the schnitzel. With a quick salad or sauteed vegetable on the side, you'll soon have a light, summery meal. Enjoy!


Chicken Schnitzel with Caper Sauce

Serves: 3-4
Time: 30 min active and total

2 chicken breasts, or 1 package chicken tenders (about 1 1/4 to 1 1/2 lbs)
salt, to taste
3/4 c. flour
1 t. oregano
2 eggs, lightly beaten with 2 T. water
2 c. panko bread crumbs
8-10 T. olive oil, for frying
2 T. Italian parsley, finely chopped
lemon wedges, for serving
2 t. capers (optional)
1 clove garlic, smashed (optional)

If using whole chicken breasts, slice into 1/4-inch pieces. Arrange chicken slices or tenders, if using, on a piece of plastic wrap. Cover with another piece of plastic wrap. Using a meat tenderizer or rolling pin, pound meat until approximately 1/8-inch thick. Remove top piece of plastic and season chicken generously with salt.

Set up a dipping station near the stove, with flour and oregano mixed in one shallow bowl or plate, eggs in another, and panko in another. Holding a chicken piece by the edge, dredge completely in flour mixture, shaking off excess, then in egg, then in panko. Repeat with remaining pieces of chicken.

In a large frying pan, heat 3-4 T. of olive oil, or enough to cover the bottom of the pan. Arrange the breaded chicken in one layer, without overcrowding. Cook for approximately 2 minutes, until lightly browned. Flip and cook for another 2 minutes, or until lightly browned. Place cooked chicken on a plate lined with paper towels and sprinkle with salt. Place another 3-4 T. olive oil in the frying pan, and repeat with remaining chicken pieces.

If making the caper sauce, turn the heat off the frying pan and add the capers and garlic to the pan. Swirl, adding another 1-2 T. of olive oil as needed to make a sauce.

Serve the schnitzel sprinkled with Italian parsley, with lemon wedges and caper sauce on the side.

Sunday, July 19, 2009

The Yale game

I already told you about BT and BI's wedding that we went to over the Fourth of July. During the cocktail hour, ES and I decided we were pretty dehydrated, and she inspired me to drink her all-time favorite beverage: ginger ale. She drinks it often, and it acts as a panacea when she's stressed out by deadlines. Ginger ale has comforting associations for me too: getting me through the stomach flu, or giving me something besides contaminated water to drink on the airplane, or helping me have fun at the Yale game.

I know, I know. Beverages at the Yale game (or at any football game, really) are usually all about beer, right? Let me explain. In about 1997, my college roommate JB and I traveled down to Connecticut for the annual Harvard-Yale game. We planned to tailgate with our friends, and then head into the stadium to watch the football game itself. The kicker was that no alcoholic beverages were allowed inside the Yale Bowl.

Our solution? Decant the cider and Rolling Rock and whatever other schlock we drank back then into empty ginger ale bottles. Seal tightly, place in Microfridge until ready for trip, transport in backpack to New Haven, sneak past security, and enjoy.

And enjoy we did! We enjoyed laughing at those Mastercard ad-inspired T-shirts that were all the rage (along the lines of "buying a keg: $50; renting a car to drive down to New Haven: $100; purchasing a Harvard sweatshirt to wear at The Game: $40; beating Yale: priceless"). We enjoyed beating Yale (even when we didn't, exactly, but close enough). We enjoyed drinking our smuggled alcoholic beverages, and I in particular enjoyed telling anyone and everyone that we were drinking ginger-ALE. I remember it as being quite hilarious, probably because I was a little tipsy and overly proud of JB's and my ingenuity. But on further consideration, why does such a resolutely non-alcoholic drink have the word "ale" in its title? For that matter, why even the word "ginger" when the flavor of the traditional Schweppes or Canada Dry little resembles that pungent, spicy root?

I still don't have an answer to the former question, but I discovered the answer to the latter when I made my very own ginger ale last week. I'd seen this article about the proliferation of ginger ale on fancy drink menus across the country, but I lacked access to the key ingredient: ginger juice. Until, that is, I found out that A&K have a juicer. So, last week, I brought over a lot of ginger root (about 15 inches or so), and, without even peeling it, we put it into their large, loud, whirring, centrifuge-like machine. The aroma of fresh ginger filled the entire kitchen, and we quickly had more than enough ginger juice to make the ginger ale from the newspaper. (Cleaning the fibrous ginger bits from the teeth of the juicer was a little bit more time-consuming than making the juice itself.)

The drink looked beautiful and smelled great. I cautiously (gingerly?) took my first sip and was rewarded with a refreshing, but spicy-almost-to-the-point-of-burning taste. The NYT version of ginger ale is extremely gingery. I now understood where the name GINGER-ale came from. The concept was obviously good, but I needed to play around with the proportions to make it more palatable. To simplify things further, I did a little internet research and learned that club soda is just carbonated water! I'm not sure why I didn't know that fact already, but now I do.

So now I present, from the same test kitchen that brought mango mojitos to B's and my wedding reception, my modified recipe for ginger ale. I bet it would be delicious with a splash of alcohol, if you want to play up the ginger-ALE angle, but I would go for vodka or rum instead of Sam Adams. I know it'll be hard to get access to a crazy juicer like A&K's (and I can't think of any stopgap measure with the blender or Cuisinart), but the original article says you can get ginger juice at most health food stores. If you like ginger ale, I'd make the effort to track it down for this recipe. Enjoy!


Ginger Ale

Time: 10 min active, 25 min total
Makes: 1 10-oz drink

2 t. ginger juice
2 T. lime juice
4 T. simple syrup (see below)
8 oz. chilled carbonated water
lime wedges and ice, for serving

First, make simple syrup by mixing 1 c. sugar and 1 c. water in a small saucepan on the stove. Heat, stirring infrequently, until sugar dissolves, about five minutes. Allow to cool for at least 15 minutes. (Extra simple syrup can be stored in the fridge, and also used for lemonade.)

Then, mix together ginger and lime juices with 4 T. simple syrup in a 12 oz. or larger glass. Add soda water, being careful that it doesn't fizz up too much, and stir all ingredients well. Add plenty of ice and garnish with a lime wedge.

Friday, July 10, 2009

Let them eat cake

Hypothetically, let's say it's Friday afternoon. You were doing something boring at work today (in my case, ACLS training; B sang "Stayin' Alive" as I left the house in the morning). You got out from your class a little earlier than you expected, and instead of staying at work to do some research, you decided to come home. And make cake. Soon, the house is filled with the smell of baking, and then freshly baked, buttermilk cake. You and B are salivating. Not long afterwards, because you chose such a quick and easy cake recipe, you and B are sharing a warm and decadent late afternoon snack, a strange (and strangely satisfying) pre-dinner appetizer. B liked it so much that he ate his piece in four (quite large) bites.


When should you eat cake? Obviously after dinner is the classic time to eat a sweet treat. And since lunch is often filled with dinner-like components, after lunch seems to be an automatically appropriate time too. But don't forget about late afternoon tea! As B and I demonstrated today, cake tastes lovely in the afternoon, with or without the tea. And I happen to know from experience that a slice of this cake makes an excellent breakfast.

Basically, any time of the day can therefore be the right time to eat cake. This fits with and extends B's philosophy that sweet breakfast items could easily be eaten for dessert if called by a different name. After all, what is a muffin if not a cupcake without icing? (Mmm, cupcakes. Must post some sort of cupcake recipe soon, so that I have an excuse to make cupcakes.)

I have lots of cake recipes, but I've turned to this one a few times since I read it in last month's Gourmet. Somehow the combination of buttermilk cake, raspberries, and the slightly crispy sugar topping seems classic and yet novel. I brought a few slices to A&K when they had us over for dinner last month, and was endlessly amused to see that A had made the same cake (with cherries, though, so totally different) to serve us for dessert. She has a good recipe eye, so I knew this one would be a winner.

The cake is a cinch to make, and relatively healthy as well (half the butter and eggs of my old standby buttermilk cake recipe). If you don't have any fresh buttermilk in the fridge (though it does last for a long time), it's perfectly acceptable to use powdered buttermilk. Use the directions on the package, but, briefly, don't attempt to reconstitute the powder yourself or you'll end up with a clumpy mess; mix the powder in with the dry ingredients according to the proportions on the package, and then use water in place of liquid in the recipe. Interestingly, JB has had such difficulty finding powdered buttermilk in Manhattan (Manhattan!) that I'm going to send her some this week with some of last month's jam bounty.

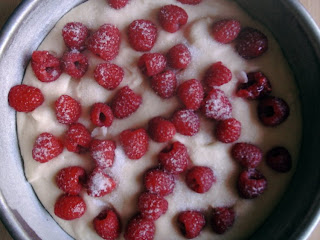
I think it's also important to know that the raspberries sink down during baking. This picture is from right before the cake went into the oven. Beautiful in its own way, but very different from how the final cake turns out.


The original recipe says you can use any kind of fruit, but so far I like raspberries best. (Sorry, A! The cherries were good too.) My mom tried blueberries alone, but she said it wasn't as special as the raspberries. Next time, I think I'll add some lemon zest to the batter, and mix in some blueberries with the raspberries. I'll try a slice of that variation at breakfast, lunch, dinner, or maybe at all three. Enjoy!

Raspberry Buttermilk Cake
Adapted from Gourmet, June 2009

Serves: 6 to 8
Time: 20 min active, 1 hr total

1/4 c. unsalted butter (1/2 stick), softened
2/3 c. sugar, plus 2 T. additional
1 large egg
1 t. vanilla extract
1/2 t. baking powder
1/2 t. baking soda
1/4 t. salt
1 c. flour
1/2 c. buttermilk
6 oz. raspberries (a little over one cup)

Preheat oven to 400 degrees. Butter the bottom of a 9-inch cake pan; line bottom with a circle of parchment paper. Then butter and flour the parchment and sides of the pan.

In a medium bowl, cream butter and 2/3 c. sugar together until fluffy. Beat in egg and vanilla completely. Add baking powder, soda, salt, and 1/3 c. flour to bowl; mix well. Then add buttermilk and remaining flour, alternating in two batches and mixing well between additions.

Turn batter into prepared cake pan. Sprinkle evenly with raspberries and then with remaining sugar. Bake for 20 to 25 minutes, or until lightly browned and tester plunged into center of cake comes out clean. Cool in pan for at least 10 minutes. Run a knife around the edge, then turn out onto a rack (cake will be upside-down) and cool for another 10 minutes. Peel off parchment. Cover cake with serving platter and invert (cake will be right-side-up). Serve warm or at room temperature.

Wednesday, July 8, 2009

Wink, wink

This past weekend we went to BT and BI's wedding in Boston, which was totally fun. You know how it is when you go to those weddings where the ceremony really reflects the bride and groom, plus they look so happy throughout the whole day, plus you really feel like they're great for each other? It was one of those kind of weddings.

Also, 4th of July is an awesome anniversary to have. It's the day B and I met, six years ago; fireworks went off, if you will. And now it's like the fireworks are in our honor every year!

Besides the wedding and the fireworks (the latter of which we ultimately watched on TV because we couldn't bear the thought of the crowds on the Esplanade), I also had the chance to catch up with a number of college friends who live on the East Coast. I heard in person how much some of them like the blog, which is obviously flattering. My favorite comment, from TS, was that the blog was "well-done" (which may be how I hope my writing comes across as, but not how I generally cook meat). Some people (ES!) also had specific requests about particular foods or types of meals that they would like to see on the blog. So, without further ado, I unveil a new (and hopefully regular) feature: Week-Night Kitchen, or WNK. Everything I write about, including today's recipe, should be ready to eat in thirty minutes or less.

To complement this new section, I think it's really important to lay out some guidelines about how to maximize efficiency in the kitchen.

1. Plan your meals. I would love to be able to say that I come home from a long day of work, rummage around in the fridge, and come up with a gourmet, table-ready (sort of like shovel-ready?) meal in a half-hour, but the truth is that it takes forethought. I would also love to be able to say that I come home from a long day of work, stop by the store to pick up a few things, and throw together a quick and delicious meal, but the activation energy to go to the store when you're feeling at all tired is daunting. So, planning ahead of time is a crucial catalyst.

JB shared with me at the wedding that she makes a list of dinners for the week, and then goes shopping once a week on Sunday afternoons. B and I rely on our easy-to-use household Google Wiki site, where we have a page devoted to "Dinners This Week" that we can both modify. I usually end up going to the store every four days or so, probably because I'm not as efficient as JB (and I'm sure I'm more forgetful, even with list in hand).

2. Multi-task. To continue with the science analogies, it's easiest to prepare things in series, but it's much more efficient to prepare them in parallel. I'm not advocating racing around the kitchen like Bobby Flay on Iron Chef America (which is a Tivo-worthy show, by the way), but while you're simmering something for ten minutes on the stove, get to work on your vegetable side-dish or cleaning up the dishes you've dirtied thus far in the cooking process. Multi-tasking takes practice, but you know what they say: practice makes perfect.

3. Get new recipes. Consider investing in a $12 per year subscription to Gourmet or Bon Appetit; the Gourmet "Quick Kitchen" section is super-useful. Great weeknight cookbooks include A Twist of the Wrist (the one by Nancy Silverton on Amazon, NOT the motorcycle road-racer's handbook I also saw for sale!) or Jacques Pepin's Fast Food My Way. You don't need to make dishes word for word, but these sources are great for inspiration...in addition to the indispensable new WNK section, of course.

4. Use your freezer. Mark Bittman wrote an excellent article about freezing a few months ago. The activation energy to get to the insane level of freezer-usage that he recommends may be insurmountably high for most people (including me), but there are some staples that I always have in my freezer. Three cheers for Costco! Pre-purchased, I keep on hand raw shrimp, chicken breasts (split breasts with bone as well as boneless/skinless), sourdough bread, fruit including blueberries and cranberries, peas, salted and unsalted butter, English muffins, crumpets from Trader Joe's, and tortillas. Homemade freezer items include pesto, marinara sauce, chicken stock, egg noodles, gnocchi dough, ice cream, bananas (which come out looking like veritable banana slugs, but are great for baking), and various random leftovers. I'm sure we have more in both categories, but that's what I can think of off the top of my head.

5. Use your fridge. J told me this weekend that a few of her friends always make "just enough" for dinner. I, on the other hand, nearly always make too much. Too much to eat on the spot, that is, but I love leftovers. Hot lunches are always nice, or you can eat some leftovers for dinner one night.

6. Try, try again (sort of like Fry, fry again?). Not every recipe is going to take exactly thirty minutes the first time you make it. This does not mean that you or your recipe are a failure. You just need to get used to each other!

Six easy steps to quick kitchen success. Got it? Good. Now, onwards with the inaugural WNK recipe.

I have a feeling that many of the recipes in the WNK category, like the one for today, will require some sort of bread, whether sourdough, pita, or a bun. Not ideal for Atkins' followers, but that's so 2003 anyway. Today's recipe requires sourdough, or some other crusty bread (whatever you have lying around in your freezer), for making panini. JB gave me and B a panini press as a housewarming present several years ago; she knew I wanted one, but I don't think she had any idea how much we would really use it! Panini sandwiches make a perfect weeknight dinner (or for me today, lunch). They're fancier than simple grilled cheese, but definitely from the same toasty-cheesy category of goodness. B and I used to make all kinds of panini, but now we've pretty much settled on our two favorite kinds: artichoke-mushroom-fontina (recipe to follow) and a modified caprese (chicken-tomato-mozzarella-basil; you remember how B feels about protein).


The artichoke-mushroom panini are best hot off the press in terms of texture, but the flavor is still excellent hours later. I made some last week for us to take on the airplane to Boston as a lunchtime snack (I dislike airplane food, but I absolutely abhor paying for it).

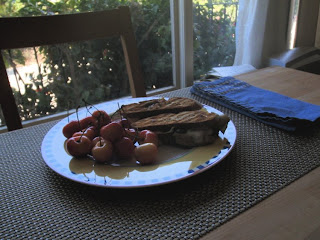
Now I know that I have a gadgety kitchen and that not everyone has (or wants!) a panini press cluttering up their shelves. Never fear: if you don't have a panini grill, you can still make these sandwiches. You'll need to rub the outer surface of the sandwich with a little bit of extra olive oil, and then use a grill pan or a skillet, flipping and pressing frequently. Whatever method you use, get to work! It only takes twenty minutes or so to make the sandwiches, but the aromas will make you hungry before then. I love panini with a simple green salad (whip it up while they're grilling) or, as you can see below, fruit. Enjoy!


Artichoke-Mushroom-Fontina Panini

Makes: four to five sandwiches
Time: 20 min active, 25 min total

2 T. olive oil
1/2 lb. crimini mushrooms, thinly sliced
6 oz. jar of marinated artichokes, such as Cara Mia
8-10 thin slices crusty bread
1/2 lb. Fontina (Danish or Italian O.K.)

Heat the olive oil in a medium-sized skillet over medium-high heat. Add the mushrooms, and saute until lightly browned, about 5 minutes, stirring occasionally. Meanwhile, drain the artichokes and slice in half lengthwise; then add to the mushroom mixture and saute for another minute.

Lay out half the bread slices on a board. Divide the mushroom-artichoke mixture evenly over the bread slices. Dot with pieces of Fontina, and cover with the other half of the bread slices. Grill in a panini press for 5 minutes, or until cheese is melted and nice grill marks are apparent.


P.S. I love comments, so please keep them coming. You may notice that a number of them have been published all of a sudden, because I realized that I had set some sort of comment moderation but then forgot to actually moderate. Oops. All better now. Plus, now I've commented on some of the comments!

P.P.S. Isn't T adorable? We met her this weekend. Usually more smiley than this serious picture would suggest though.